7.28.2010

Grilled King Salmon with Avocado Salsa


It is not every day that a little, southern girl like me gets to dine on such a lavish fish. I know you lucky people out yonder West have an easy access to this wonderful tasting fillets, but not so in Savannah, Georgia. Do we even have a restaurant that serves King Salmon?

Well, all I can tell you is that I was ecstatic when my husband and his three brothers planned a fishing trip to Alaska. Weeks before he left, all I could think of was fresh, wild salmon he would bring home and began searching for salmon recipes. That's a foodie for ya. Foodies don't think about the event itself so much but what we will cook for the event. Crazy, isn't it?

Their trip was a great success as you can see: 27 silver salmons on the first fishing day!


And my dear hubby landed a 21-pound King Salmon! When I heard this, I swooned with pleasure. My dear husband, my hero!
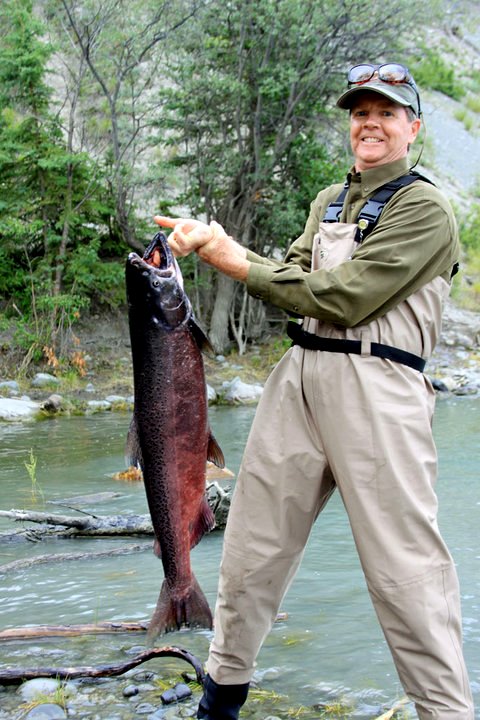
I cannot fully explain to you what it felt like to open up a box full of salmons that my Sweetie caught and brought for me, traveling 3700 miles with flight cancellations and hours of agonizing delays. I just wanted to show him how much I appreciated his effort with my love language: cooking.

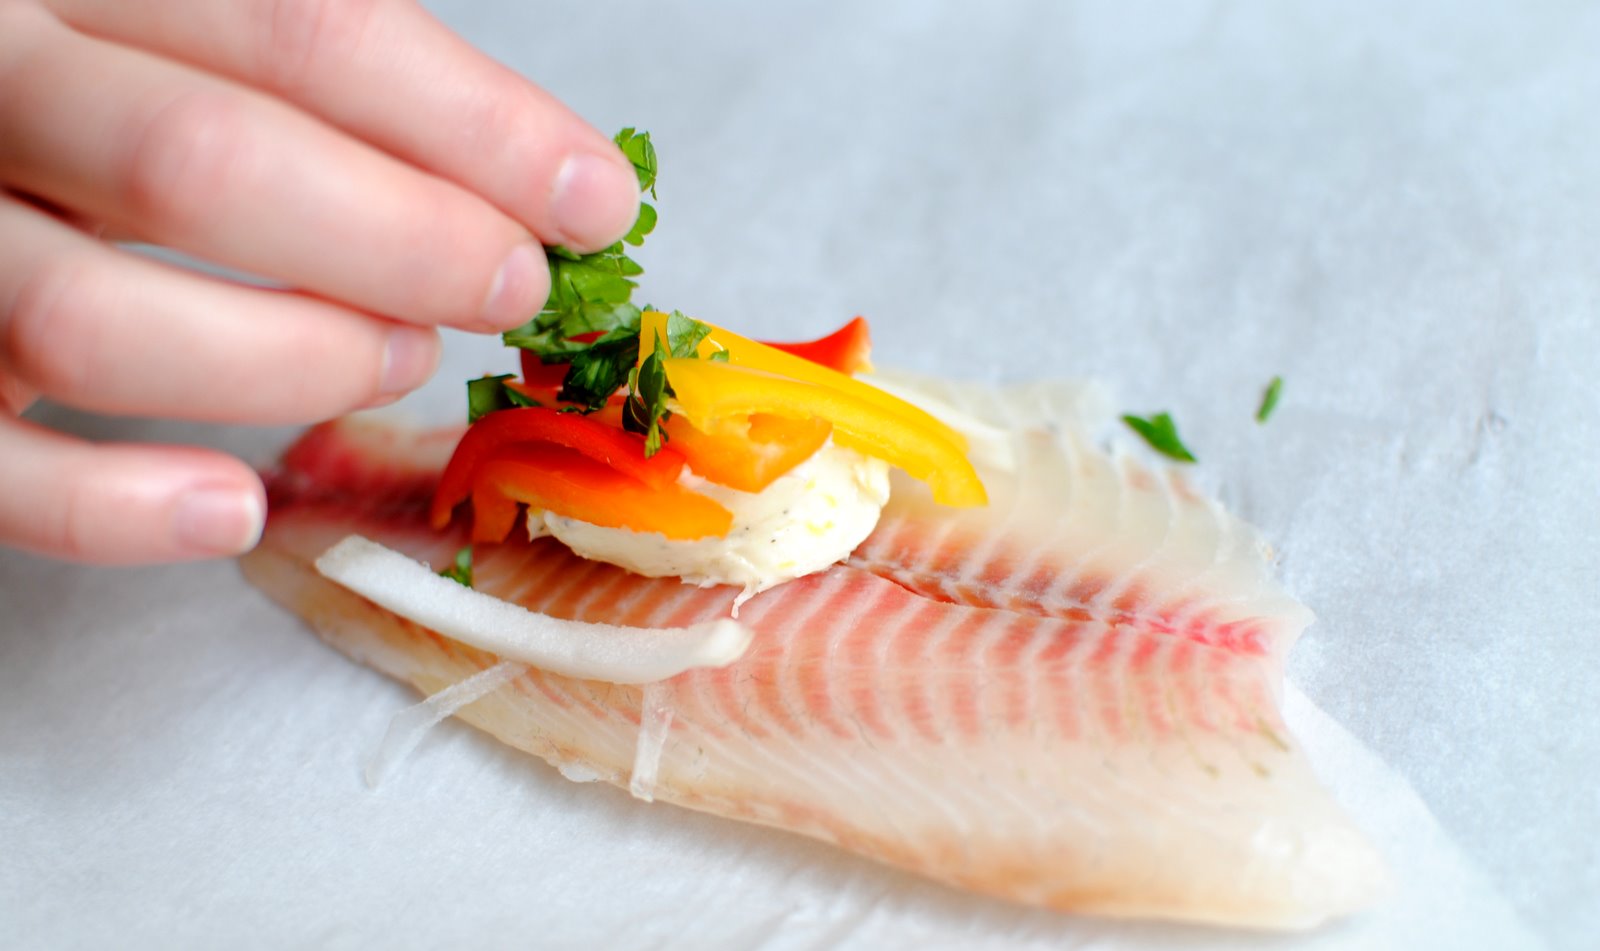
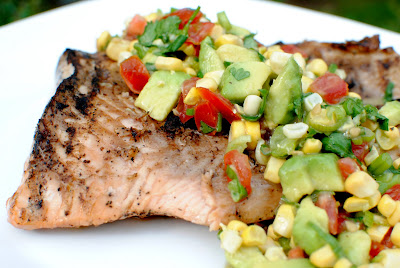
Seasoning should be simple, we both agreed, to bring out the wonderful flavor and texture of the wild salmon, so just a drizzle of extra-virgin olive oil and salt and pepper were all I used before grilling the fillet.

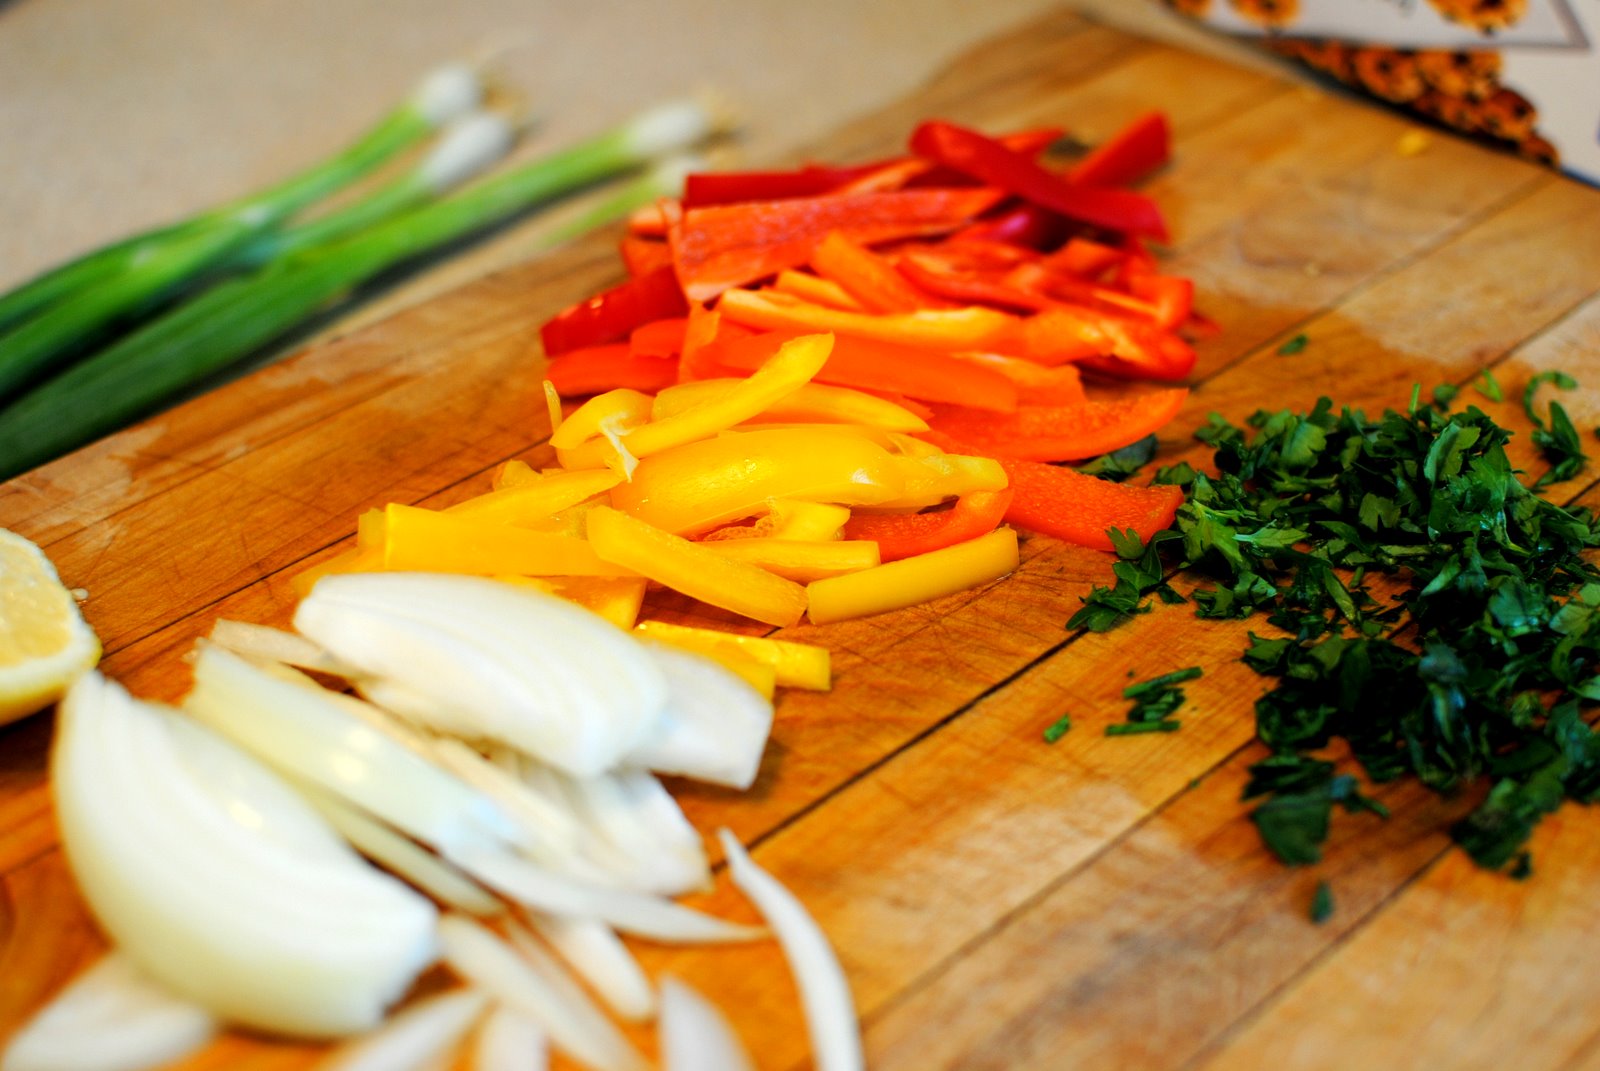
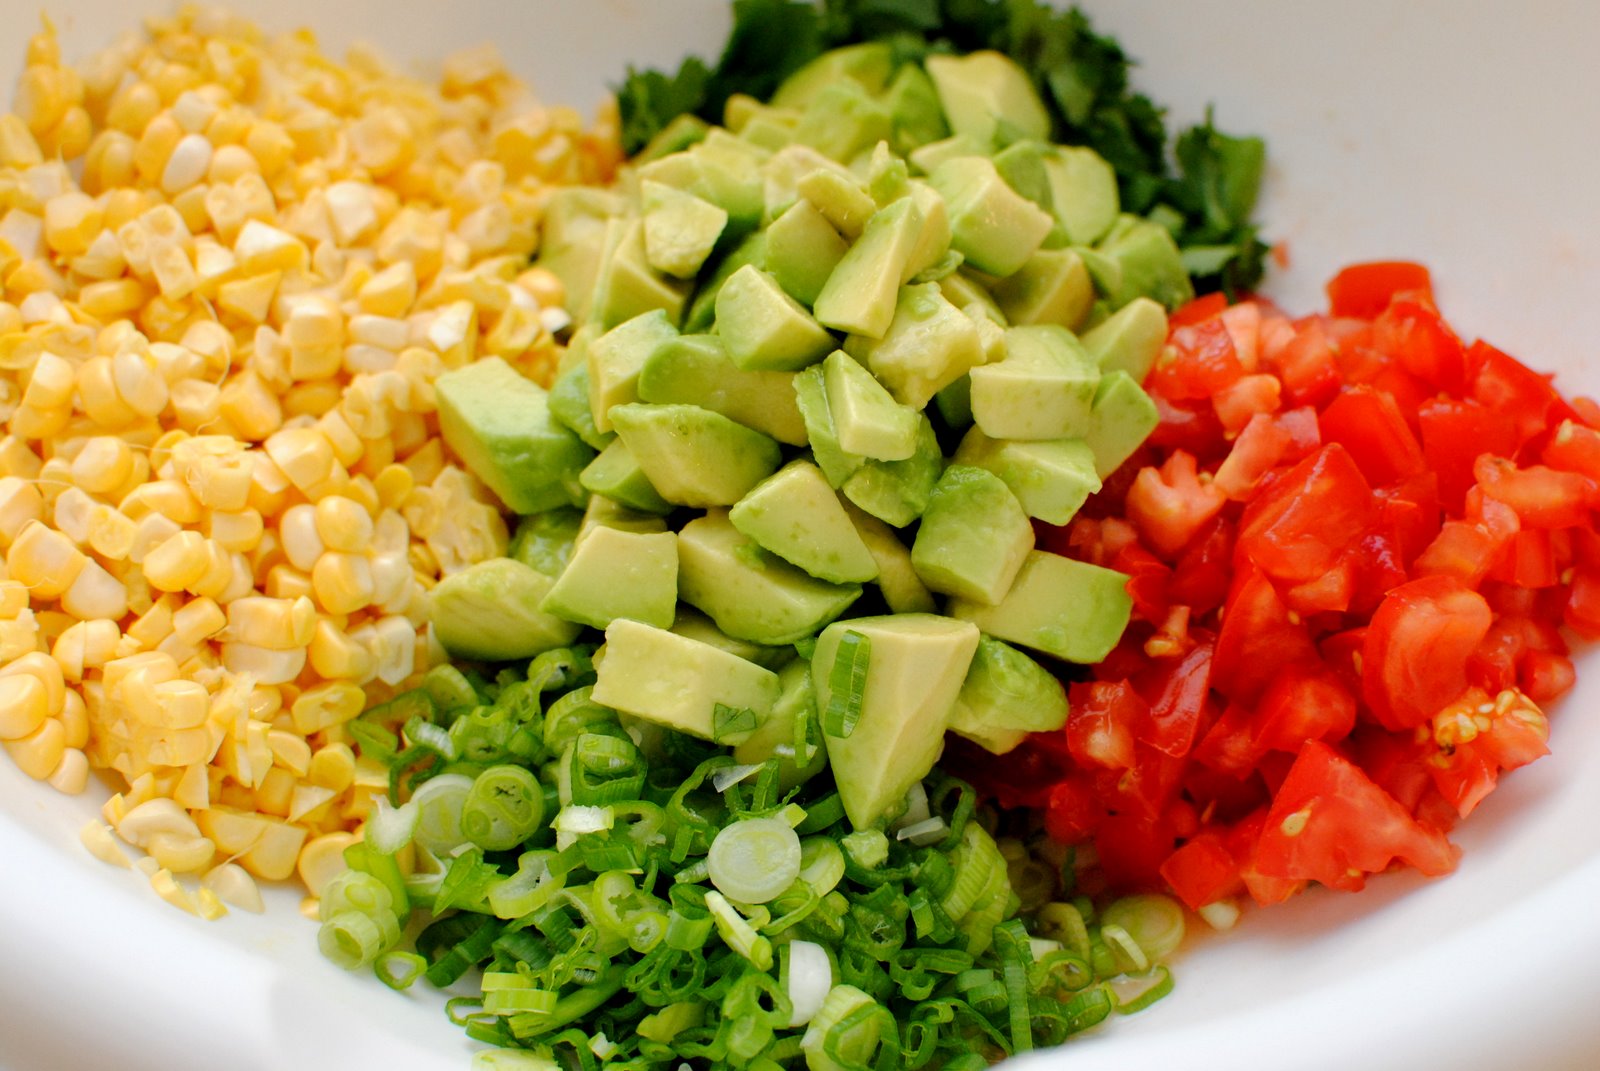
To accompany the fish, I made a simple Avocado salsa with fresh sweet corn and vine ripe tomatoes.

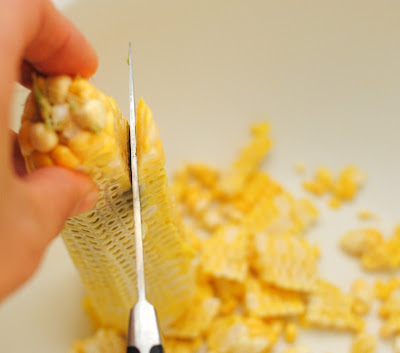
To cut corn kernels off the cob, hold the top of the cob in a bowl, and simply run the sharp paring knife down the cob. Don't get too close to the cob or you will have tough, inedible cob parts.

Dip diced avocado in fresh lime juice for a few seconds and drain. This will keep the avocado from turning brown and you can prepped the veggies several hours ahead before serving. Add chopped cilantro and green onions, tossed with fresh lime juice and plenty of salt and pepper. Grilled French bread rounded off this simple meal perfectly! Here, wanna bite?


Grilled Salmon with Avocado Salsa
Serves 6

1-1/2 pound of salmon fillet
2 Tablespoon of olive oil, extra-virgin
1 teaspoon of salt
1 teaspoon of freshly ground pepper

Preheat grill for medium heat.

Pat dry the fillet with paper towel. Rub fish with olive oil, then salt and pepper.Lightly oil grill grate. Place salmon on the preheated grill. Cook salmon about 6- 8 minutes per side, depending on the thickness of the fillet. Don't over cook! Top with salsa and serve.

Note: If the center is too rare for you, cover the fillet with a paper towel and microwave the fish for 1 to 1-1/2 minute. Let rest for a few minutes before serving.

For Salsa

3 Avocados, ripe but firm, pitted and diced *dip in lime juice, to prevent discoloring
2 tomatoes, vine-ripe, diced **toss with 1/4 teaspoon of salt and drain in colander for 10 minutes
3 sprigs Green onions, finely sliced
1/2 Cup Chopped Cilantro
1 Small Jalapeno, seeded and finely minced
Peel and juice of 1 lime
Salt and Pepper to taste

Combine all ingredients in a large bowl. Season well with salt and pepper. Can be made up to 2 hours ahead.

7.26.2010

Peanut Brittle Ice Cream Pie


Our Sunday fellowship meal was a huge hit last night. My church family just can't get enough Asian food. Here was our dinner menu:

Pan Seared Pork Tenderloin
Fried Egg Rolls with Red Chili Sauce
Sesame Noodles (will post this recipe later)
Pacific Rim Caesar Salad
Watermelon Slices
and Peanut Brittle Ice Cream Pie

Even though I may have lost about ten pounds in sweat frying 300 egg rolls on the back deck of Point Pleasant building in Georgia heat, my church family is so worth it! They are so thankful and spare no praise for what I do.

As for dessert, I wanted something "peanutty" to round off an Asian dinner. And Epciurious.com had this recipe to try. I altered the crust recipe which called for dark brown sugar. After making a batch, I realized that molasses in dark brown sugar caramelized too much in oven and made the crust too hard.

Hard crust + hard peanut brittle = chipped tooth & dental fillings. Not good. So I used the granulated sugar instead and it worked beautifully.

Don't soften the ice cream too much. Layer scoop-able but firm ice cream on baked crust, put a sheet of plastic wrap and gently spread with your warm palms and fingers. Peel off plastic wrap, then sprinkle peanuts and drizzle caramel sauce, repeat. This time saving process eliminated the extra steps of freezing each ice cream layer.

Drizzle caramel sauce and brittle.

Ahhhh, isn't this just so beautiful? This dessert was so good, it brought tears to my friend, Emily. Now, now, it's OK, Em. Dry your tears and here is another piece.......


Peanut Brittle Ice Cream Pie

Caramel Sauce:

3/4 cup whipping cream
1/2 vanilla bean, split lengthwise
2 tablespoons (1/4 stick) unsalted butter
1/4 teaspoon fine sea salt
3/4 cup sugar
1/3 cup water
1/4 cup light corn syrup

Pie:

9 whole graham crackers
1/4 cup granulated sugar
5 tablespoons unsalted butter, melted
1 1/2 teaspoons vanilla extract
1/2 cup salted roasted cocktail peanuts
3 pints premium vanilla ice cream, "scoopable" but firm
1 cup coarsely chopped peanut brittle (click for recipe)

For caramel sauce:

Place cream in small saucepan. Scrape in seeds from vanilla bean; add bean. Bring just to simmer. Mix in butter and sea salt; set vanilla cream aside.

Stir sugar, 1/3 cup water, and corn syrup in heavy medium saucepan over medium heat until sugar dissolves. Increase heat; boil without stirring until syrup turns deep amber, brushing down sides with wet pastry brush and swirling pan occasionally, about 12 minutes. Remove from heat. Whisk in vanilla cream (mixture will bubble). Cool and set the sauce aside.


For pie:
Preheat oven to 350°F. Spray 9-inch pie dish, set aside.

Finely grind graham crackers in processor. Combine in a large bowl, ground graham cracker, sugar, melted butter and vanilla; blend until moist crumbs form. Press crumbs firmly onto bottom and up sides pie dish. Freeze 15 minutes.

Bake crust until light brown, about 10-12 minutes. Freeze 1 hour. Spoon 1 1/2 pints ice cream into crust, layer plastic wrap over ice cream and pat down gently until layer is smooth, peel off the plastic. Drizzle 1/2 cup of caramel sauce, sprinkle 1/2 cup of salted peanuts and 1/2 cup of peanut brittle.

Spoon remaining 1 1/2 pints ice cream over, repeat same method with plastic sheet, peel off the plastic and discard. Drizzle 1/2 cup of caramel sauce. Sprinkle pie with remaining brittle. Freeze 4 hours. DO AHEAD: Pie can be made 3 days ahead; wrap with plastic and foil, then freeze.

Store remaining sauce in refrigerator. Reheat gently in microwave before serving pie.

Cut a wedge of ice cream pie, drizzle over extra sauce and sprinkle extra brittle on top.

Note: Both peanut brittle and caramel sauce can be substituted with store bought to save time. But the taste of homemade brittle and sauce cannot be beat. Hint, hint! :)


7.21.2010

Peanut Brittle


This peanut brittle reminds me of Korean Taffy Candy called "Yut", 엿. As a child in Korea, I remember how excited I'd get hearing the "Yut" man's soliciting cry. "Here is Yut! Your Yut is here! Come and buy it!" A man pushing his two-wheeled handcart with assorted Korean traditional taffy candy would get all the neighborhood kids scurrying to the main street. I would beg for a coin or two from my mom and dash off to join my friends to get a piece cut off by the "Yut" man. Oh, how wonderful that tasted!

Do you want to see how Yut was cut back then? Watch this:


Yut is made with rice/malt mixture and texture is hard but chewy, perfect consistency for losing a dental crown. All sorts of ingredients are added such as pumpkin seeds, black and white sesame seeds, and of course the peanuts, which is my favorite!

Another reason I am posting this brittle recipe is because it's a part of the Peanut Brittle Ice Cream Pie recipe which I made for this Sunday fellowship dinner. I don't know about you, but even as an experienced cook, I get little overwhelmed when I see a recipe that is three pages long. So I am breaking it down for you. Here is part one of the Peanut Brittle Ice Cream Pie Recipe.

1. Make Peanut Brittle.


Sugar, water, dark and light corn syrup is cooked first. Then add peanuts & baking soda.

Spread mixture thin. I should have used two commercial full size sheet pans, instead of one to make this thinner. *kick, kick* What was I thinking? But with a pot of bubbling candy lava mixture in my hand, there was no turning back. So my brittle is much thicker than I wanted. But who is going to know but you?


Peanut Brittle

3 cups sugar
2 cups water
3/4 cup light corn syrup
3/4 cup dark corn syrup
4 cups coarsely chopped salted roasted peanuts
2 tablespoons (1/4 stick) unsalted butter
1 tablespoon baking soda
1 teaspoon vanilla extract

Butter 2 heavy large baking sheets. Stir first 4 ingredients in heavy large saucepan over medium heat until sugar dissolves. Increase heat to high and boil without stirring until candy thermometer registers 260°F., about 40 minutes. Reduce heat to medium-low.

Mix in peanuts and butter and cook until thermometer registers 295°F., stirring constantly, about 15 minutes. Add baking soda and vanilla and stir briskly (mixture will foam up). Immediately pour out onto prepared baking sheets, dividing evenly. Spread out brittle as thinly as possible. Let stand until cold and hard.

Break brittle into pieces. Store in airtight containers at room temperature. (Can be prepared 1 month ahead.)


7.20.2010

Fried Wontons


Every Tuesday during this summer, my friends, our daughters, and I get together to learn to sew and to cook. My husband coined the name "Terrific Tuesday". Terrific because his wife is finally learning to sew colonial clothes.

You see, we went on a family vacation to Williamsburg, Virginia with a homeschooling group this past spring and completely fell in love with this beautiful historic site . And you could recognize this particular group from a mile away because most of us were strolling through the streets with colonial period clothes and with several children in tow. My entire family was most elegantly garbed, thanks to my master seamstress friend, but I vowed that I would learn how to sew from her this summer.

With much enthusiasm and nudging from my husband, "Terrific Tuesday" was launched six weeks ago. So far I have completed, with lots of help, colonial kerchief, apron, haversack, and a shift. Sorry that you have to suffer through looking at my colonial under garment here, but as a Korean, this is such a wonderful and meaningful skill I am learning.

Oh, yeah, back to Fried Wontons.....after a morning of sewing and lunch, we begin the cooking class, my comfort zone where I don't struggle so much as I do with sewing.

Yummy filling makes the wontons. Here are simple but very tasty ingredients of ground pork, minced shrimp, water chestnut, and green onions. Mix gently with egg, cornstarch, and seasoning.

Only one teaspoon is needed per wonton wrapper (overfilling will cause seams to open during deep frying) . Apply egg wash on the edges and lightly press the edges together, then fry.

Serve with your favorite dipping sauce. It's hard to east just one, I know. I had two dozens today.


Fried Wontons

1/2 lb shrimp, peeled, deveined, chopped fine
1/2 lb. ground pork
1 can water chestnuts (8oz), drained and finely chopped
3 sprigs of green onions, finely minced
2 tsp. cornstarch
1 teaspoon salt
pinch of sugar
1/2 teaspoon white pepper
2 teaspoon sesame oil
1 egg beaten

60-75 wonton skins
4 c vegetable oil

Egg Wash:
1 egg white
1 teaspoon cornstarch

Mix egg white and 1 teaspoon of corn starch in a small bowl until well combined. Set aside.

Combined first 10 ingredients in bowl and mix well.

Spoon about 1 teaspoon of shrimp-meat mixture in center of wonton skin. Brush edges of skin with egg wash, using tip of your finger. Fold skin over to form triangle and press edges to seal.

Heat oil in a heavy duty cast iron pot or deep fryer to 375 degrees F. Fry wontons 6-7 at a time until golden brown, about 2 minutes, turning once.

Drain on wire rack. Can be made 1 hour ahead. Serve with your favorite dipping sauce.

NOTE: For reheating, pre-heat oven 300 degrees F and bake for 4-5 minutes until warmed.

7.19.2010

Tim's Grilled Chicken


It is always a very special treat when Tim (IPC's renown grill master and owner of Silk Road Catering Co.) grills for the church. And our Sunday fellowship meal last night was incredible with his grilled chicken. There is no better grilled chicken found in Savannah.

His charcoal grill is as simple as it comes. A remodeled iron barrel on a single axle trailer, with a smoke stack, grilling rack, an exterior thermometer, and with lots of character.

Here is a useful gadget for those who are hard-core charcoal grillers: chimney starter. An inexpensive tool that will help you charcoal burning real fast without using charcoal starter fluid. Tim can't use this since he uses such a large volume of charcoal, but this is a great tool for home cooks.

To feed 250 people last night, Tim cooked 36 whole chickens. He splits them in half for quicker cooking time. After sprinkling dry rub and placed on the hot grill, Tim lets his grill do its thing. I don't think anyone sitting in the service could hardly concentrate on the sermon with wonderful aroma of grilled meat and white smoke billowing out of the smoke stack right outside the window.

Waiting patiently....he makes it look so easy.

After two hours of low heat grilling and casual attention, here emerged the most delicious grilled chicken, ever. sigh.....it was so wonderful! Why, we really didn't even need any salad or sides. Most people, including me, would have been very content with Tim's grilled chicken and some barbecue sauce. If you are in Savannah area and need a fantastic barbecue catered for a large group, call this grill meister, there is no one better in Savannah area, not one.

Silk Road Catering LLC, Tim and Tricia Barrett, home (912) 376-2506; cell(912)713-5040

Many thanks to Eddie and Walt for assisting Tim last night!


Grilled Chicken
(Serves 4)
1 Whole Chicken, rinsed and split in half
1/2 Cup of Dry Rub (click for recipe)
Extra Kosher salt for sprinkling

Equipment:
Charcoal grill
Charcoal
Chimney starter

1. Here is a video link on using chimney starter by Chef John Mitzewich.
http://video.about.com/bbq/Using-a-Chimney-Starter.htm

2. Season the chicken with dry rub.

3. After spreading the hot coal, ensuring your grid level is at its highest for low, even temperature. Put chicken halves on clean grid. Cook with cover on, occasionally turning and watching for fat flare ups on the meat.
About 1 1/2 hour or until internal temperature reaches 165 deg. F

7.16.2010

Spicy Fig and Ginger Jam


Each summer, I have a major battle: the birds and I race for the ripe figs culminating under the leaves. This year my five-year old fig tree really went all out, and is producing so much fruit, each branch droops to the ground. And my backyard birds know it. At every opportunity, they are swooping in to take gaping pecks at my ripe, luxurious fruit.


So to outsmart my feathered enemies, I have devised a foolproof plan. I go out to gather figs after breakfast, lunch, and dinner. Thankfully, this plan seems to be working so far, because I have been able to gather enough figs to make my jam, with some to spare (leaving only a handful that have been pillaged by the birds.)


Crystallized ginger gives a little spunk while fresh lemon juice lightens the flavor.


If you prefer jam with big, fruity chunks, coarsely chop the figs, otherwise, pulse the fruit in processor for a minute. After adding sugar and water, bring it to boil and simmer for 30 minutes.

Less than one hour of prep and cooking time, you will have this beautiful, glorious jam for your scones and biscuits. Actually, I am craving Brie en croute with fig jam! Oh, won't that be just heavenly?

Spicy Fig and Ginger Jam

4 cups coarsely chopped fresh figs
2 1/4 cups sugar
1/3 cup water
1/4 cup fresh lemon juice
4 tablespoons chopped crystallized ginger
1/4 teaspoon salt

Combine all ingredients in a large saucepan; bring to a boil. Reduce heat, and simmer, uncovered, 30 minutes or until thick, stirring frequently. Cool; pour into airtight containers.

Note: Refrigerate Fig and Ginger Jam in airtight containers up to six weeks.

7.10.2010

Kao Thai Cuisine in Thunderbolt


It was a very special treat to go on a date just the three of us: my husband, my Nikon, and me! When my sister-in-law who is a fine cook and very discerning foodie recommended and generously gave us a gift card to this restaurant, I knew it would be a good one. And boy, she was absolutely right! My husband and I fell in love with Kao at first bite!

Don't let the exterior of the building hold you back. Inside the unassuming store front is beautifully decorated interior: linen cloths, polished glasses, and simple but attractive decor.

Here was our fresh beginning: Basil Roll filled with rice vermicelli, carrots, lettuce, fresh basil leaves, and shrimp, with just yummy dipping sauce.

My husband chose Num Tok as a starter: sliced beef sirloin with Thai herbs, lime juice, chili, and onion, an absolutely delightful dish.

We both fought to order this whole flounder, scored and deep fried with lightest sweet and sour sauce with a hint of cilantro. He won, and I hoped while savoring my delicious entree that he would be too full to finish it. No such luck for me. I think I'll order the flounder AND something else next time.

My entree was this flavorful beef sauteed with Thai Basil Sauce. I love Thai Basil.... I can eat it with almost anything, may be even with cereal.

Isn't their jasmine rice beautiful? I took a big chunk out of the back before I remembered to take a picture. It's not so easy eating a wonderful meal and trying to take photos at the same time!

I also ordered Grilled Shrimp and Mango salad but there was a storm when my salad arrived and the lighting was not so ideal. But it was absolutely heavenly, too! Slices of fresh mangos with lime juice and peanuts......oh my, I am getting hungry again.

And for dessert? Get this: Mango ice cream, battered and deep fried with coconut sauce and flambeed with Bacardi.....can a meal get any better than this?

Behind all these incredible dishes is equally incredible chef : Wasan Trimas! Thank you Wasan, we had the best Thai meal EVER! I am so sorry that it took me so to come and visit you! And thank you Rita for such attentive and friendly service.

If you love Thai food, look no further. Kao has the best Thai food in Savannah. Hey, how about meeting me for a lunch? It's my treat!

7.09.2010

Chocolate Mousse


Here is the third course for the Endeavor Conference , which will be held in Oregon next week: Chocolate Mousse. Again, Miranda and I had to choose a simple but elegant dish which can be made ahead. Among all the mousse recipes I searched in my cookbooks and on the internet, this seemed simplest to make, other than Jello Chocolate Pudding, of course.


The recipe called for four eggs separated but if you are multiplying the recipe to feed 60, there will be a lot of eggs to separate. Without using any gadgets marketed out there, here is the easiest and quickest to separate the egg yolks: your hand. Gently crack the egg into your hand and cradle the egg yolk with your fingers, while the egg white to slip through your fingers. Voila! Easy, isn't it?

Bitter sweet chocolate is weighed.


Egg whites and half of sugar is beaten with a hand mixer until glossy, stiff peak is formed, then added to melted chocolate mixture


Fresh raspberries make beautiful toppings.


For easier and cleaner piping into champagne glasses or phyllo cups, put finished mousse into a gallon size zip lock baggies. Snip the corner with scissors and use it as a piping bag. If the mixture is too warm and runny, chill the bag in the refrigerator for half an hour.

To serve, chill mousse at least 2 hours or overnight.


Chocolate Mousse

4 large eggs, separated
1/2 cup sugar, divided
1/4 cup (1/2 stick or 2 oz) unsalted butter, cut into 1/2-inch pieces
1/4 cup water
1 teaspoon instant espresso powder
8 ounces bittersweet (not unsweetened) or semisweet chocolate, chopped
1 Tablespoon, Kahlua coffee liqueur

1 1/2-pint basket fresh raspberries
Mint Leaves for garnishing

Whisk egg yolks, 1/4 cup sugar, butter, 1/4 cup water, and espresso powder in large metal bowl to blend.

Set bowl over saucepan of simmering water (do not let bowl touch water); whisk constantly until thermometer inserted into mixture registers 160°F, about 2 minutes.

Add chocolate and whisk until melted and smooth. Turn off heat; take bowl off the heat.

Using electric mixer, beat egg whites in another large bowl to soft peaks. Gradually add remaining 1/4 cup sugar, beating until stiff and glossy. Remove chocolate from over water. Fold 1/3 of beaten whites into warm chocolate mixture to lighten. Add Kahlua. Fold in remaining whites. Cover and chill until set, at least 2 hours or overnight.

7.08.2010

Tilapia En Papillote


Continuing with Endeavor Conference menu, my friend and I chose fish en papillote (fr. pah-pee-YOHT; PAH-peh-loht) to be served for an elegant sit-down meal. This is very fun way to serve steamed fish, especially to a group of young ladies who may not have experienced a lot of fine dining.

I chose Tilapia because it is inexpensive, mild white fish, but you can use salmon, grouper, mahi or just about any fish that fancies you, even shrimp and other shell fish.

There are many ways to can form parchment bag to enclose the fish. Here we folded the parchment paper in half and cut into a semi-oblong shape (about 6 inches in radius). Idea is to completely seal the fish and veggies without having any liquid escaping while baking.

Get your veggies ready. Julienne tri-colored peppers, onions, and fresh Italian parsley are just some of the options. Asparagus tips, fennel bulbs, leeks, or potatoes can be added to your parchment bag. Make sure your veggies are cut thinly so they will be cooked tender within 10 minutes in the oven along with the fish.

I made simple lemon butter with lemon zest, garlic, and salt and pepper. Butter will melt and flavor the fish while baking. Lay the fillet on one side of folded edge in the middle of paper, layer the veggies and fold over the paper.


Beginning from one edge, double fold the paper and crimp tightly to seal the open side. Sealed packets can be done up to two hours prior to baking.

Bake at 400 degrees F. for 10-12 minutes. Parchment parcel will balloon beautifully as the steam fills it. Using scissors, cut an "x" on top of parchment before you take them to the table.

At the table, gently peel back the parchment packets for the diners. Your guests will gasp with delight at a wonderful sight and smell. And you will be elevated to Food Goddess status, well almost. Serve with your favorite rice or potato dish.


Fish En Papillote
Serves 8

Parchment Paper, cut into 8-12 inch oblong shape (fold in half and cut)

8 fillets of fish, 5 to 8 oz
Julienne veggies : sweet peppers, onions, zucchini, or your favorite veggies
1/4 of fresh herbs: dill, basil, parsley
Fresh ground pepper to taste.

Lemon Butter:
1 stick of salted butter, softened
Fresh lemon zest from one lemon
1 tablespoon of fresh lemon juice
1 teaspoon salt
3 cloves of garlic, grated
a pinch of dried thyme

Combine all lemon butter ingredients in a small bowl. Set aside.


Preheat oven 400 degrees F.

Rinse fish and dry well with paper towel. Lay the fillet on one side of folded line of parchment. Top with a tablespoon of lemon butter, then with julienne veggies. Fold over the parchment and completely sealed the open edges together, double fold and crimping as you go.

Lay the packets on a baking sheet for 10-12 minutes for thin fillets, 15-17 minutes for thick fillets such as salmon, mahi, or grouper.

Cut a small "x" carefully on top of packet. And serve immediately, peeling back the packets for the diners. Serve with your favorite rice or potato side dish.